Painter's tape is an essential tool for achieving clean paint lines, protecting adjacent surfaces, and simplifying painting projects. However, even high-quality tape cannot guarantee a professional finish if it is selected or applied incorrectly. Common problems such as paint bleeding, poor adhesion, adhesive residue, and peeling paint often result from simple errors during surface preparation, tape application, painting, or removal.
Understanding these common painters tape mistakes can help both DIY users and professional contractors improve their results, reduce costly rework, and protect finished surfaces. From choosing the right adhesive strength to knowing when and how to remove the tape, a few practical adjustments make a significant difference. Below, we break down the top mistakes painters make and share expert painter's tape tips to help you achieve flawless results every time.
1. Choosing the Wrong Painter's Tape for the Surface
One of the most common painters tape mistakes is using the same general-purpose tape for every substrate. Different materials and coatings require specific adhesive strengths; a tape formulated for durable, smooth drywall may severely damage delicate wallpaper, wood trim, or freshly painted surfaces.
Using tape with excessive adhesion frequently causes peeling paint, surface tearing, or stubborn adhesive residue upon removal. Conversely, tape with insufficient tack may lift during painting, allowing wet paint to seep underneath and create jagged edges.
How to avoid this mistake:
- Assess the substrate: Identify the surface texture, finish, and overall condition before selecting a masking product.
- Match adhesive strength: Choose an adhesive level suited for the specific task rather than assuming stronger tack is always better.
- Use Low Tack Painter's Tape: Apply Low Tack Painter's Tape on delicate or newly finished surfaces where gentle release is required.
- Test before full application: Check recommended removal windows and test a small strip in an inconspicuous spot if compatibility is uncertain.
When searching for the best painter's tape for delicate surfaces, prioritize specialty products engineered specifically for sensitive finishes. Low-tack options significantly reduce surface damage during removal when used according to manufacturer guidelines.
2. Skipping Proper Painting Preparation
Even the highest-grade painter's tape will fail if applied to a dirty or unstable substrate. Dust, grease, drywall sanding residue, moisture, and flaking paint prevent the pressure-sensitive adhesive from establishing consistent contact, increasing the risk of lifted edges.
Surface preparation is especially critical on textured walls, unfinished wood, or high-touch trim. If the tape cannot bond uniformly, liquid paint will infiltrate microscopic gaps and ruin the finished border.
How to avoid this mistake:
- Clean thoroughly: Remove dust, dirt, and grease using a damp cloth or surface-appropriate cleaner.
- Ensure complete dryness: Allow freshly washed or treated surfaces to dry entirely before applying tape.
- Remove loose debris: Scrape away flaking paint or loose particles that interfere with adhesive grip.
Thorough painting preparation creates a reliable foundation for consistent tape adhesion, preventing defects that otherwise become visible only after the paint dries.
3. Applying Painter's Tape Incorrectly
Knowing How to Use Painter's Tape properly is just as vital as selecting the right roll. Frequent application errors include stretching the tape tightly while unrolling, laying it down unevenly, creating wrinkles, or leaving small gaps at overlapping joints.
Stretching puts tension on the backing, causing the tape to contract, curl, or pull away from corners shortly after installation. Wrinkles and misaligned overlaps also create channels for paint penetration.
How to avoid this mistake:
- Apply gradually without tension: Unroll manageable sections (12 to 18 inches) and lay the tape down naturally without pulling or stretching.
- Smooth as you go: Press the backing flat during placement to eliminate air pockets and wrinkles.
- Overlap joints cleanly: Use shorter strips around corners and detail work, overlapping adjoining ends tightly so no exposed gaps remain.
4. Not Sealing the Tape Edges Properly
Paint seepage is one of the most frustrating issues in any coating project. When liquid paint meets unsealed gaps along an uneven wall texture, capillary action draws it beneath the tape, leaving blurred, uneven lines.
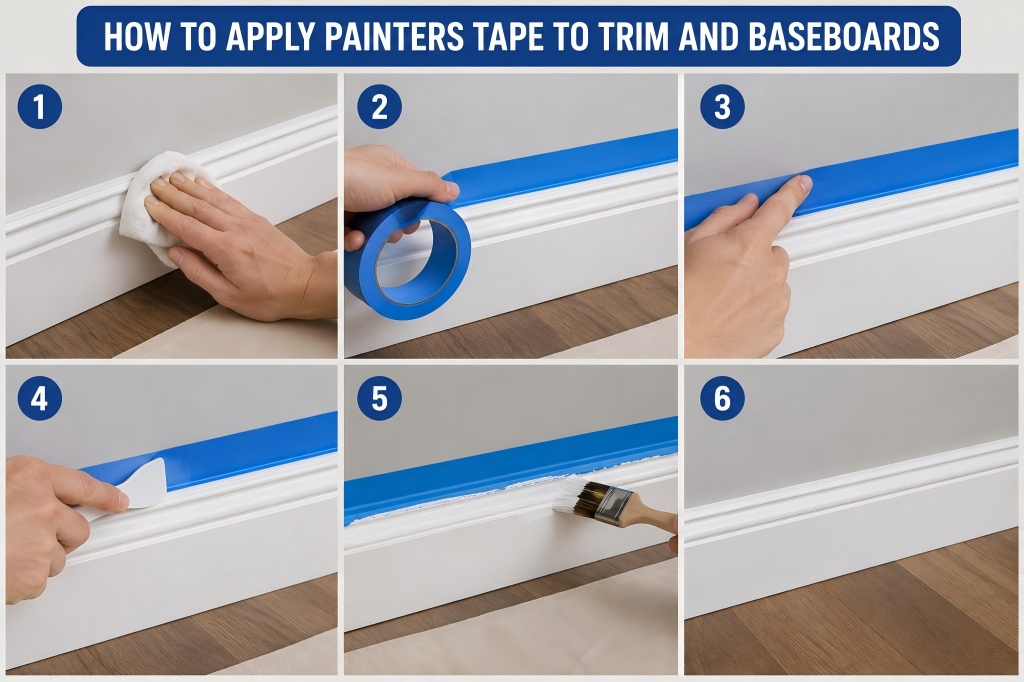
Relying on a quick pass of your hand rarely generates enough pressure to bond the tape edge completely into surface textures.
How to avoid this mistake:
- Burnish the edges: Run a putty knife, plastic scraper, or fingernail firmly along the entire masking edge to lock down the adhesive.
- Inspect critical junctions: Double-check corners, trim joints, and overlapping sections for lifted edges before opening a paint can.
- Seal textured surfaces: For rough walls, a proven technique for how to get crisp paint lines with painter's tape is brushing a thin coat of clear sealer or basecoat color over the tape edge first to block microscopic gaps.
Prioritizing edge sealing is the most reliable strategy for preventing paint bleed under tape and achieving razor-sharp color transitions.
5. Applying Too Much Paint Along the Tape Edge
Overloading your brush or roller and pressing heavily against the masking border forces excess paint under the tape. Heavy application also builds a thick paint ridge along the edge; when the tape is pulled, this bridge can tear or peel cured paint off the wall.
Repeatedly brushing back and forth over the tape boundary further increases the risk of seepage, even on well-sealed edges.
How to avoid this mistake:
- Control paint load: Wipe excess paint off brushes and rollers before working near the masking line.
- Brush away from the tape: Apply paint in thin, even coats, brushing away from the tape edge using a light, dry-brush motion.
- Respect recoat times: Follow the paint manufacturer's drying guidelines between coats rather than applying a single heavy layer.
6. Leaving Painter's Tape on for Too Long
How long can you leave painter's tape on? The answer depends on the backing material, adhesive chemistry, substrate, and job-site environment. Most painter's tapes carry a rated removal window—commonly 3, 7, 14, or 30 days.
Leaving tape applied beyond its rated timeframe—especially in rooms exposed to direct sunlight or high heat—causes rubber or acrylic adhesives to cross-link and bond permanently to the surface. When removed late, the backing may shred or leave behind stubborn Painters Tape Residue.
How to avoid this mistake:
- Verify rated timeframes: Check product specifications for indoor and outdoor UV exposure limits before starting.
- Schedule timely removal: Plan your workflow so masking tape is removed promptly once painting is complete.
- Clean residue safely: If Painters Tape Residue occurs, avoid aggressive scraping; use a mild, surface-safe adhesive remover tested on an inconspicuous area first.
7. Removing Painter's Tape at the Wrong Time or Angle
Improper removal technique can ruin an otherwise flawless paint job. Pulling tape too early smudges wet paint, while yanking it off rapidly at a 90-degree angle after the paint has fully hardened can crack the paint film and leave jagged edges.
How to avoid this mistake:
- Time it right: Begin removing painter's tape once the paint is dry to the touch (typically 30 to 60 minutes after the final coat), before it cures into a rigid film.
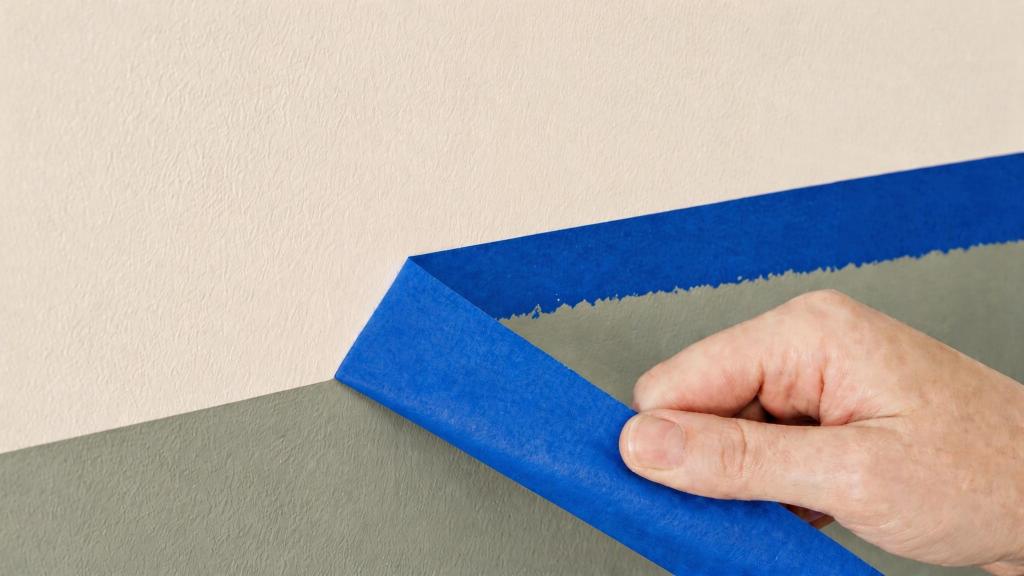
- Pull at a 45-degree angle: Peel the tape back slowly and steadily at a 45-degree angle away from the painted edge, folding it back over itself.
- Score bridged paint: If the paint has cured completely across the tape boundary, lightly score the edge with a sharp utility blade before pulling.
- Mastering removing painter's tape requires balancing paint drying progress with the tape's removal window.
8. Ignoring Paint Curing Time and Surface Compatibility
A newly painted wall that feels dry to the touch is not necessarily cured. Latex, acrylic, and oil-based coatings pass through distinct drying and curing stages, remaining vulnerable to adhesive pressure for days or even weeks.
Applying tape over uncured paint often lifts the fresh coating or leaves imprint marks during removal.
How to avoid this mistake:
- Distinguish dry vs. cured: Check the paint manufacturer's technical data sheet for full cure times before taping over fresh finishes.
- Pair low-tack tape with cured coats: Even when using Low Tack Painter's Tape or the best painter's tape for delicate surfaces, confirm the underlying paint has reached sufficient hardness.
- Perform an adhesion test: Test a small strip on newly cured coatings before masking large areas.
9. Practical Painter's Tape Tips for Cleaner Painting Results
Avoiding common masking failures does not require complex tools—just a disciplined workflow from selection to removal. Follow this step-by-step checklist on every project:
- Choose painter's tape suitable for the surface: Match adhesive strength and UV ratings to your specific substrate and environment.
- Clean and dry the surface before application: Remove dust, grease, and loose debris completely.
- Apply the tape smoothly without stretching it: Lay manageable sections flat to prevent tension, curling, or wrinkles.
- Press down the edges to improve contact: Burnish the masking border firmly to support preventing paint bleed under tape.
- Apply paint in controlled, even coats: Avoid heavy buildup directly along the tape edge.
- Follow the recommended tape application time: Never exceed the manufacturer's rated removal window.
- Remove the tape carefully according to product instructions: Peel slowly at a 45-degree angle once paint is dry to the touch.
Following these proven painter's tape tips and understanding How to Use Painter's Tape properly will streamline your workflow and consistently produce sharp, professional results.
Conclusion: Avoid Common Painter's Tape Mistakes for a Better Finish
Crisp, professional paint lines depend on more than simply placing tape along a wall. Selecting the right adhesive grade, executing thorough painting preparation, sealing edges properly, controlling coat thickness, and removing the tape at the right moment all work together to prevent rework.
By avoiding these common painters tape mistakes, contractors and DIY painters alike can eliminate paint bleed, prevent Painters Tape Residue, and protect delicate finishes.
SLAA manufactures and supplies professional-grade painter's tapes engineered for diverse commercial, industrial, and architectural masking requirements. From low-tack delicate surface tapes to high-temperature and UV-resistant masking solutions, our products deliver reliable adhesion and clean, residue-free removal.
Looking for reliable painter's tape solutions for your business or upcoming projects? Contact SLAA today to request product specifications, samples, or wholesale pricing.