When painting walls, trim, or furniture, nothing is more frustrating than peeling off tape and seeing messy edges. Paint bleed is a common problem, but the solution is simpler than most people think. Learning how to use painter's tape properly can make the difference between a professional-looking finish and uneven paint lines.
In this guide, you’ll discover five professional techniques that help prevent paint bleeding under tape and produce sharp paint lines every time.
Why Paint Bleeds Under Tape
Before mastering how to properly use painters tape, it’s important to understand why bleeding happens.
Paint usually seeps under tape because of:
- Dust or dirt on the surface
- Uneven or textured walls
- Poor tape adhesion
- Applying thick paint layers
- Incorrect tape removal
- Removing tape at the wrong time
- Using low-quality masking materials
Using the correct method for how to apply painters tape ensures that the tape forms a tight seal against the surface.
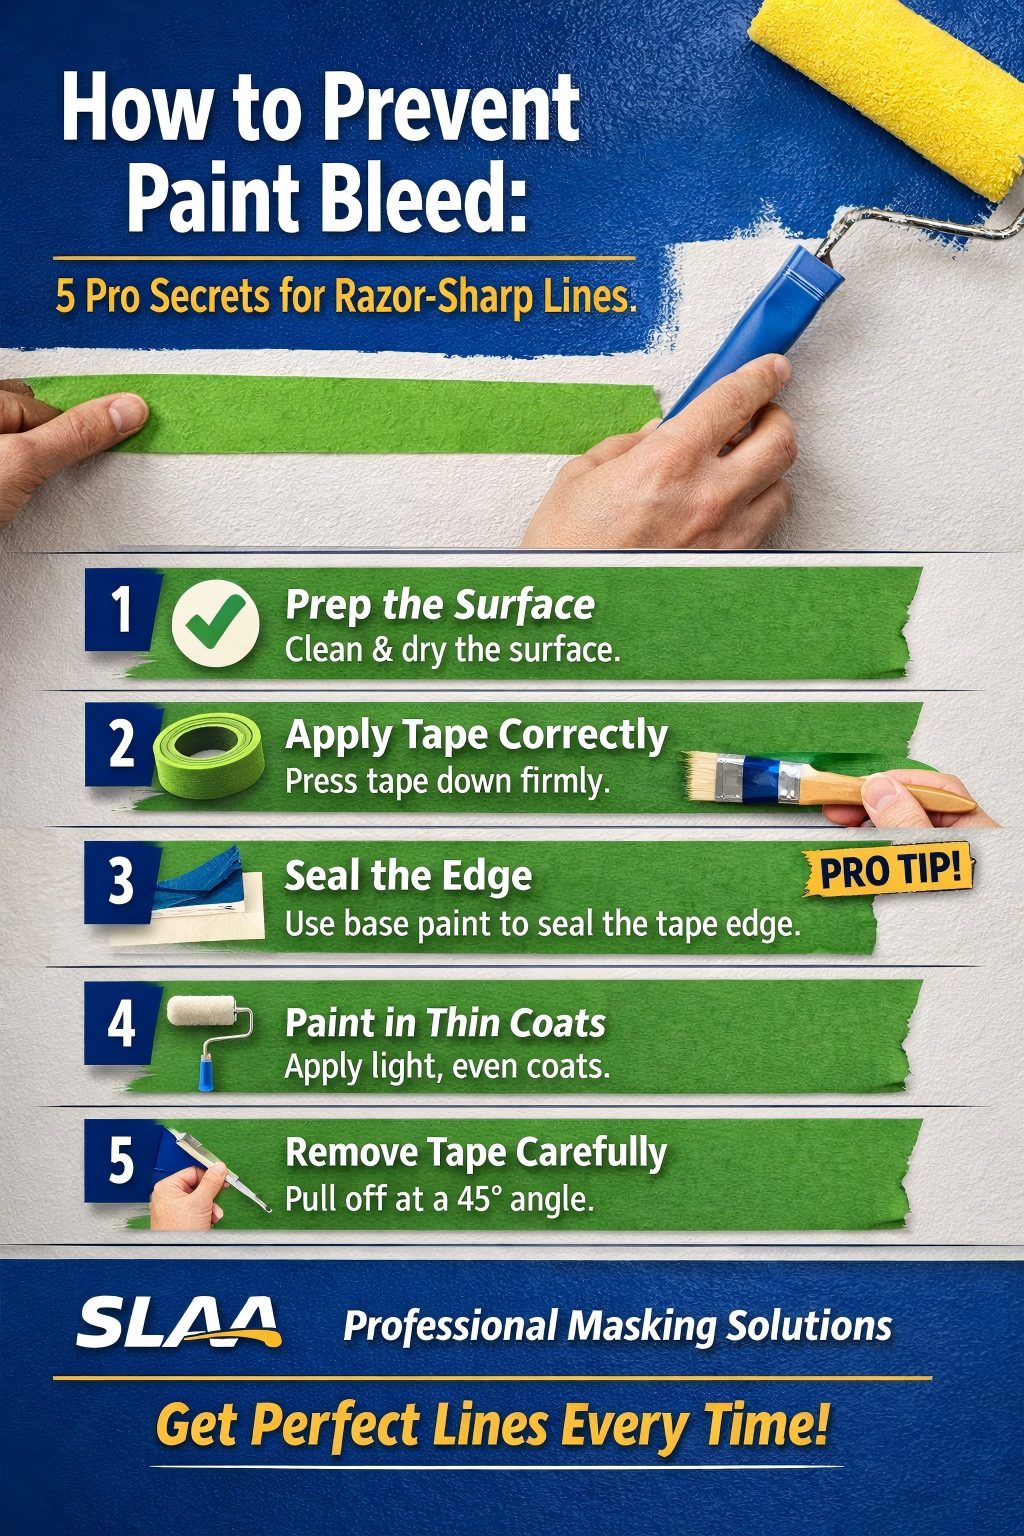
5 Pro Secrets for Sharp Paint Lines
1. Start With Proper Surface Preparation
The most common reason for paint bleed isn't the tape itself—it's what’s underneath it. Tape cannot create an airtight seal on a dirty or textured surface.
- Clean the surface: Wipe surfaces with a damp cloth to remove dust.
- Degrease: Remove grease with a mild detergent if needed.
- Dry completely: Let the surface dry entirely before you begin how to apply painters tape.
A clean surface ensures maximum adhesion and minimizes gaps where paint can seep underneath.
2. Apply Painter’s Tape Correctly
Not all tapes are created equal. While standard masking tape is fine for general tasks, it is often too thick for high-precision work. Professionals often choose ultra-thin Washi paper tapes for the absolute sharpest lines.
- Match the surface: Ensure your tape is rated for the specific surface you are painting (e.g., delicate, multi-surface, or rough).
- Apply straight strips: Use continuous strips and avoid stretching the tape, as it will eventually "snap back" and lift at the edges.
- Overlap and press: Overlap corners slightly for full coverage. After laying the tape down, run a clean finger or a plastic squeegee along the edge with firm pressure to "activate" the adhesive and smooth out any air bubbles.
- Firm pressure: Use a putty knife or credit card to firmly press the tape edge into the surface. This step alone significantly reduces the risk of preventing paint bleeding under tape.
3. Use the “Seal the Edge” Technique (The Pro Secret)
If you are working on a textured wall or want a 100% guaranteed barrier, this is the most important tip for how to use painters tape without bleeding.
- The Base Coat Method: Once your tape is applied, paint over the edge with the existing wall color (the color under the tape). This "bleeds" the original color under the tape first, effectively sealing any gaps. Once it dries, apply your new color.
- The Caulk Method: For trim or baseboards, apply a very thin bead of paintable caulk over the tape edge and wipe it almost entirely away with a damp finger. This creates a physical barrier that paint cannot penetrate.
4. Apply Paint in Thin, Controlled Coats
Excess paint is a primary cause of bleed-through. To avoid this:
- Use light, even coats.
- Avoid overloading your brush or roller.
- Allow each coat to dry slightly before adding another.
Thin layers reduce the chance of paint forcing its way under the tape edge.
5. Remove Tape at the Right Time
Knowing how to use painters tape correctly also involves knowing exactly when to take it off.
- Remove while damp: For the cleanest results, remove the tape while the paint is still "to the touch" damp. If the paint dries completely, it can form a film over the tape and peel away in chunks.
- The 45-Degree Rule: Pull the tape back on itself at a steady, 45-degree angle. This "cuts" the paint film cleanly rather than tearing it.
- Score if needed: If the paint has dried completely, lightly score the edge with a utility knife before removal.
Step-by-Step Summary: How to Use Painter’s Tape Correctly
1. Clean and dry the surface.
2. Apply tape carefully without stretching.
3. Press edges firmly to ensure adhesion.
4. Seal the edge using the base coat or caulk method.
5. Apply thin, controlled paint coats.
6. Remove tape at the proper time at a 45-degree angle.
Following these steps ensures consistent professional results.
Choosing the Right Painter’s Tape
Different surfaces require different tapes. When selecting painter’s tape, consider:
- Adhesion strength (low, medium, or high)
- Surface compatibility (delicate walls, wood, glass)
- UV resistance for outdoor projects
- Clean removal ratings
Using high-quality tape greatly improves performance when learning how to apply painters tape for detailed paint work.
Common Mistakes to Avoid
Even experienced DIY painters make these mistakes:
- Applying tape on dusty surfaces
- Skipping the edge sealing step
- Using too much paint at once
- Leaving tape on for too long
- Pulling tape off too quickly
Avoiding these issues will significantly improve your painting results.
Final Thoughts
Mastering how to properly use painters tape is a matter of technique and using the right materials.By preparing surfaces, applying tape carefully, sealing the edge, using thin paint coats, and removing tape correctly, you can easily prevent paint bleeding under tape and create clean, sharp paint lines.
Improve Your Painting Results with SLAA
Looking for high-quality painter’s tape and masking solutions for professional results?
SLAA provides reliable adhesive tape products designed for clean removal, strong adhesion, and precise paint lines.
✔ Professional masking tape solutions
✔ Automotive and decorative painting tapes
✔ Reliable adhesion with clean removal
Contact SLAA today to find the right painter’s tape for your next project and achieve flawless painting results.